Ever find yourself digging through HDL code or waveforms just to recall the exact name of a DUT signal you need to drive in your cocotb test? “What was the name of that signal I needed to wiggle??” If you’ve been there, you’re not alone. In Python-based hardware testbenches using cocotb, the Device Under Test (DUT) is manipulated via attributes on a dut handle – but those attributes are dynamically discovered, meaning your IDE can’t auto-suggest them, and a typo in a signal name won’t be caught until runtime. This is where Copra comes in. Copra is a new subproject in the cocotb ecosystem that automatically generates Python typing stubs for your DUT, enabling rich IDE auto-completion and static type checking for cocotb testbenches. In this blog post, we’ll introduce the motivation behind Copra, how it works under the hood, how to integrate it into your workflow, and we’ll dive into detailed examples (including an adder, a matrix multiplier, and a multi-dimensional array DUT) to see Copra in action. We’ll also discuss how tools like VS Code’s Pylance and type checkers (mypy, etc.) benefit from these stubs and how to configure your environment to use them. Let’s get started!
Why Type Stubs for Cocotb? (Motivation)
Cocotb enables writing testbenches in Python to verify HDL designs, treating the HDL design’s signals as attributes of a Python dut object. This dynamic approach is powerful, but it poses some challenges for developer productivity:
-
No Auto-Completion: Because dut attributes (signals, sub-modules, etc.) are determined at runtime by introspecting the HDL, your IDE or editor has no knowledge of them beforehand. You can’t get a quick dropdown of dut. members, which slows down development and forces you to constantly cross-reference your HDL code or documentation. With type stubs for the DUT, IDE extensions like VS Code’s Pylance can list the DUT’s signals in an autocomplete pop-up, making it much faster to write and explore test code.
-
Catching Typos and Errors Early: Without static type info, a simple typo in a signal name (e.g. using dut.avalid instead of dut.valid) will only manifest as an AttributeError during simulation. With type stubs, you can run Python static type checkers (like mypy) to catch mis-typed signal names or other interface mismatches before you run the sim. This leads to a tighter feedback loop and more reliable test code.
-
Interface Contracts and Mocking: The DUT’s interface can be thought of as a contract. By generating a stub that defines this interface in Python (classes with typed members for each signal/port), we create an explicit model of the DUT in code. This opens up possibilities like using the stub classes to create high-level abstractions or mock versions of the DUT interface. For example, you could import the stub class in a unit test (without a simulator) and attach custom behaviors or dummy values to mimic the DUT, using the stub purely as an interface specification. This isn’t a mainstream use case yet, but it’s enabled by having the DUT’s interface in a Python type.
Overall, adding typing information to cocotb DUTs improves the developer experience significantly. It bridges the gap between the dynamic world of HDL simulation and the static analysis world of modern Python development. You get the best of both: the flexibility of cocotb and the productivity features of an IDE.
Meet Copra: Type Stubs for Cocotb
Copra is the tool that makes all of the above possible. In a nutshell, Copra automatically generates a Python stub file (.pyi) for your DUT, describing the DUT’s hierarchy (modules, signals, arrays, etc.) as Python classes with type annotations. This stub file can be consumed by IDEs and type checkers to understand the DUT’s structure. The name “Copra” fittingly comes from the coconut theme (cocotb’s logo is a coconut) – copra is the dried kernel of a coconut. Think of Copra as the essential core that supports your cocotb testbench by providing detailed knowledge of the DUT’s “inside.” It is an official cocotb subproject (currently in alpha development) aimed at being the canonical solution for DUT type information.
How does Copra work? At a high level, Copra integrates with your cocotb test run to read the DUT hierarchy that cocotb has already discovered and then emit a stub. It relies entirely on cocotb’s built-in hierarchy discovery (cocotb automatically introspects the HDL design’s hierarchy at runtime). Copra simply calls dut._discover_all() to trigger cocotb’s discovery, then reads the existing cocotb handle types and writes out a .pyi file containing class definitions that mirror the DUT structure. We’ll go deeper into the mapping and generation in a moment. Importantly, Copra can operate in two modes: automatically during a test run or as a standalone stub generation tool. In either case, the outcome is the same – a stub file (by default named copra_stubs.pyi) describing your DUT.
To clarify the workflow, let’s first visualize the stub generation process that Copra performs internally:

In the flowchart above, Copra runs as part of a simulation (or a special run) to gather the DUT’s structure. It then maps the DUT elements to types, produces Python class definitions in memory, and writes them to the stub file. Finally, your IDE or type checker can consume that stub file to provide autocompletion and error checking.
Copra Architecture and Workflow
Under the hood, Copra is organized into a few key components that work together during stub generation:
-
Integration Layer: This is how you invoke Copra. There are two integration paths:
-
Autostub (Automatic mode) – Copra provides an autostub cocotb test that runs at simulation start to generate the stub automatically during a normal test run. This is provided by copra.integration.autostub and requires minimal setup (just one line in your Makefile). We’ll discuss this in detail shortly.
-
Standalone Stubgen (Batch mode) – Copra also provides a standalone stub generator script (copra.integration.standalone_stubgen.py) which can be run outside of a normal test to produce the stub file without running all your tests. This is useful for generating stubs ahead-of-time or in CI pipelines.
-
Discovery (Reading Cocotb’s Hierarchy): This component reads the DUT’s hierarchy that cocotb has already discovered. When invoked (given the top-level dut handle), it calls
dut._discover_all()to ensure cocotb has populated all child handles, then iterates through the_sub_handlesdictionary that cocotb maintains. It reads the existing cocotb SimHandle objects that cocotb has already created and classified. Cocotb has already determined what is a signal vs. a sub-hierarchy, single-bit vs. vector, etc. This phase produces a structured Hierarchy Dictionary that essentially copies the design’s tree from cocotb’s internal representation: keys are signal/module names and values carry the type info that cocotb has already determined. -
Type Reading & Formatting: As Copra reads through the DUT hierarchy, it extracts the cocotb handle type that cocotb has already determined for each element. Cocotb already has different handle classes for different signal types (e.g., LogicObject for single-bit, LogicArrayObject for multi-bit vectors, HierarchyObject for modules, etc.) and has already instantiated the correct handle type for each HDL element. Copra simply reads these existing types using cocotb’s internal
_type2clsmapping. For example, it reads that cocotb has already classified: -
A single logic signal (1-bit wire/reg) is already a LogicObject in cocotb.
-
A bus or packed array (multi-bit signal) is already a LogicArrayObject in cocotb.
-
An unpacked array (e.g., an array of registers or a memory) is already an ArrayObject in cocotb – a generic type that specifies both the value type and the handle type of its elements. For instance, an array of 8-bit logic vectors is already ArrayObject[cocotb.types.LogicArray, cocotb.handle.LogicArrayObject] in cocotb, meaning “an array of logic-array elements”.
-
A generate block (or any indexed generate construct) is already treated by cocotb as an array of hierarchical scopes: HierarchyArrayObject[SubModuleClass]. Cocotb already yields multiple instances of a submodule, each of which Copra will represent as a stub class SubModuleClass.
-
A sub-module instance (normal module hierarchy) is already a HierarchyObject in cocotb (and will have its own class in the stub).
-
Design parameters (like Verilog parameters or VHDL generics) that appear in the simulation are already treated as constant values by cocotb. Cocotb maps integer parameters to IntegerObject (if they appear as simulator objects), or if they appear as constants of vector type, they already show up as LogicArrayObject of a certain width.
Essentially, Copra simply reads cocotb’s existing handle types and converts them to string representations for the Python stub file. We will see concrete examples of this mapping in the next section. (No signal is left behind – even unusual names or types will get some representation. If a signal name isn’t a valid Python identifier, Copra will still include it via an index accessor rather than as a direct attribute, more on that below.)
- Stub Generation: Finally, with the hierarchy read from cocotb and each element’s type extracted, Copra generates the stub file. This involves writing out Python class definitions in a .pyi file. The top-level DUT is represented as a class (named after the top-level module, e.g. Adder if the HDL module is “adder”), which extends cocotb.handle.HierarchyObject (or HierarchyArrayObject if the top itself is an array). Inside that class, each child signal or sub-module becomes a class attribute with a type annotation for the corresponding cocotb handle type. For example, if your top-level has a signal valid which is a 1-bit wire, the stub class will have valid: cocotb.handle.LogicObject. If it has a 16-bit bus data, you’ll see data: cocotb.handle.LogicArrayObject. If it has a sub-module uart, you’ll see uart: Uart where Uart is a class defined later in the stub (extending HierarchyObject). In cases of arrays or generates, attributes are represented with generics: e.g. regs: cocotb.handle.HierarchyArrayObject[RegBlock] (for a generate array of submodule RegBlock).
Copra also generates __getitem__ overloads for each attribute, to mimic dictionary-style access. This means you can do dut[“signal_name”] as an alternative to dut.signal_name. In the stub, these are declared with type-safe literals: for each signal foo, Copra adds an overload def getitem(self, name: Literal[“foo”]) -> FooType: …. This is especially useful for signals that cannot be represented as straightforward Python attributes (for example, a signal named data-in with a hyphen cannot be an attribute dut.data-in in Python syntax, but you can access it as dut[“data-in”]). Copra’s stub will not create an invalid attribute name, but it will still list the signal in the getitem overloads so your IDE knows that “data-in” is a valid key and returns the correct type. In summary, every DUT member is accessible either as an attribute or via index, with proper type info. Copra carefully sanitizes names for class definitions and attributes where possible (e.g., a module named my.vhdl.module might become class My_vhdl_module in the stub), but uses the literal index trick to cover any edge cases.
After generation, the stub file (by default named copra_stubs.pyi) is written to disk. By default it will land in the current working directory (or a directory of your choosing via config). Typically, that means if you ran make in your test directory, you’ll find copra_stubs.pyi there. The stub file includes all necessary import statements for cocotb handles and typing constructs, so it’s self-contained. For example, at the top you’ll see imports of cocotb.handle and cocotb.types, and typing.Literal and overload for the type signatures. There’s also a header comment indicating it was auto-generated by Copra.
To illustrate the architecture, here’s a block diagram of Copra’s components and how they interact with the cocotb simulation and the output:

In this diagram, the Integration Module (autostub or standalone) is triggered by the simulator or user to start stub generation. It invokes the Discovery process to read the DUT handles that cocotb has already created. Cocotb has already interfaced with the simulator to get the hierarchy (dut is cocotb’s gateway to the HDL objects). Once Copra reads the structure and types from cocotb, the Generation module produces the stub file. Later on, your IDE or type checker reads the stub file to provide features like autocomplete and error checking.
Mapping HDL Hierarchy to Python Types in Copra
One of the most crucial aspects of Copra is how it reads cocotb’s existing HDL to Python type mapping and formats it for stub files. Let’s break down how cocotb handles this mapping (which Copra then represents in stubs) with a summary (and then we will see actual examples from real DUTs):
-
Single-bit signals (e.g., a std_logic in VHDL or a 1-bit wire/reg in Verilog) –> cocotb.handle.LogicObject.
Rationale: cocotb’s LogicObject is the handle class for a single-valued logic signal (it has properties like .value that represent a single bit or maybe a 4-state value). -
Packed arrays (multi-bit vectors) (e.g., std_logic_vector or bit [N:0] in Verilog) –> cocotb.handle.LogicArrayObject.
Rationale: A contiguous vector of bits is treated as a unit – a logic array. LogicArrayObject is the cocotb handle for such signals. Under the hood, these often correspond to BinaryValue or similar for values, but as a handle type it’s distinct from single-bit. -
Unpacked arrays (e.g., VHDL arrays, SystemVerilog logic [7:0] mem [0:3] where one dimension is an array of elements) → cocotb.handle.ArrayObject[…] (a generic type). This one needs more explanation: Copra uses ArrayObject with two type parameters: the first is the value type of each element, the second is the handle type of each element. For example:
-
An array of bytes (8-bit logic vectors) would be ArrayObject[cocotb.types.LogicArray, cocotb.handle.LogicArrayObject]. Here each element’s value is a LogicArray (8-bit, for instance) and each element’s handle is a LogicArrayObject.
-
An array of single-bit elements (like a 16-element array of std_logic) would be ArrayObject[cocotb.types.Logic, cocotb.handle.LogicObject]. The first type param might be Logic (for a single bit value) and second is LogicObject (the handle for each bit).
-
If you have multi-dimensional arrays (arrays of arrays), Copra represents each level as either an ArrayObject or flattens it if contiguous. Generally, each unpacked dimension introduces an ArrayObject layer. We will see a concrete multi-dimensional example soon (spoiler: Copra covers arrays of vectors, vectors of arrays, and so on).
-
Generate blocks / Indexed scopes (e.g., SystemVerilog generate loops or VHDL generate-genvars) → cocotb.handle.HierarchyArrayObject[Class]. This is similar to the ArrayObject concept but for hierarchical entities. If your DUT has something like generate for (i=0; i<4; i++) instantiating similar logic, cocotb represents that as an array of hierarchy objects. Copra will produce a stub class for the generated item (e.g., if inside the generate you instantiated a sub-module or created signals, Copra makes a class for that scope) and the parent will have an attribute of type HierarchyArrayObject[ThatClass]. This indicates you can index into it (e.g., dut.gen_block[0]) to get an instance of the sub-scope. Indeed, Copra also provides getitem overloads so that using an index returns the correct type in the eyes of the type checker.
-
Modules (hierarchy instances): cocotb.handle.HierarchyObject. Any named sub-module instance in the DUT gets its own stub class (as a subclass of HierarchyObject). The top-level itself is one such module. Attributes that refer to sub-modules will have the type of the corresponding stub class. For example, if your DUT instantiates uart_inst: uart, the top-level stub might have uart_inst: Uart where Uart is a class in the stub derived from HierarchyObject.
-
Parameters / Constants: Typically, if these appear as part of the simulation handle space, Copra will map integer parameters to cocotb.handle.IntegerObject. In practice, for VHDL generics or Verilog parameters, cocotb might not expose them as first-class runtime objects unless they’re accessible via some handle (some simulators do, some don’t). In the examples we’ve seen, parameters that are widths often end up being represented as logic vectors of a certain width (effectively a constant wire). For instance, in a Verilog module with parameter WIDTH=8, if the simulator exposes it, Copra might list WIDTH: LogicArrayObject of width 8 (or IntegerObject if treated purely as number). The key point is that if it’s there, Copra will stub it – so your stub can even include design-time constants, which might be useful to ensure your testbench uses the same values.
Cocotb’s mapping covers all these cases, and Copra simply reads these existing handle types to represent them accurately in stub files. Now, let’s solidify this understanding by looking at some real examples.
Copra in Action: Examples
Copra comes with a set of example DUTs to demonstrate stub generation. We’ll examine a few of these to see how the DUT’s HDL structure is reflected in the generated stub.
Example 1: Parameterized Adder with Generate Blocks
One example is an adder module that is parameterized by a data width and contains a generate block. In HDL, this might look like an adder that has input vectors A and B, an output X, a parameter DATA_WIDTH, and perhaps generates multiple “debug register” sub-blocks based on the data width.
Top-level Adder class: Copra generated a class Adder extending HierarchyObject. In it, we see attributes that correspond to what cocotb discovered:
- A: cocotb.handle.LogicArrayObject – A is a vector (multi-bit signal)
- B: cocotb.handle.LogicArrayObject – similarly, B is a vector of the same width
- X: cocotb.handle.LogicArrayObject – the sum output, also a vector
- DATA_WIDTH: cocotb.handle.LogicArrayObject – the parameter appears as a LogicArrayObject (likely treated as a 32-bit value in simulation)
- gen_debug_regs: cocotb.handle.HierarchyArrayObject[GenDebugRegs] – here’s the generate block! This is a container of sub-handles, each of type GenDebugRegs
Copra also generated a sub-class for the generate block, named GenDebugRegs:
- It inherits from cocotb.handle.HierarchyObject (since it’s a sub-scope)
- It has attributes debug_a_local: LogicArrayObject, debug_b_local: LogicArrayObject (debug signals)
- debug_valid: LogicObject – this one is a single-bit signal
- i: cocotb.handle.LogicArrayObject – perhaps an index signal
From this stub, we can see how cocotb classified the signals and Copra represented them:
- Vectors like A, B, X were already LogicArrayObject in cocotb
- Single-bit like debug_valid was already LogicObject in cocotb
- The generate block was already a HierarchyArray of GenDebugRegs instances in cocotb
Usage in tests:
if TYPE_CHECKING:
    from copra_stubs import Adder as DUT
else:
    DUT = Any

@cocotb.test()
async def adder_basic_test(dut: DUT):
    dut.A.value = 5
    dut.B.value = 10
    await Timer(2, units="ns")
    assert dut.X.value == 15, "Adder result incorrect"
    dut.gen_debug_regs[0].debug_valid.value = 1  # Full autocomplete chain
This pattern ensures that during runtime dut is just an Any (so the code runs normally), but for type checking dut is understood to be an instance of the Adder class. This gives us the best of both worlds: no runtime overhead, but full IDE support.
Example 2: Multi-Dimensional Arrays
The MultiDimArray example DUT demonstrates multi-dimensional and mixed packed/unpacked arrays. This design tests various combinations:
- Many signals are simply
LogicArrayObject(fully packed vectors) - Complex arrays like
in_2d_arr_unpacked: ArrayObject[cocotb.types.LogicArray, cocotb.handle.LogicArrayObject]represent arrays of logic vectors - Multi-dimensional unpacked arrays like
in_2d_vect_unpacked_unpacked: ArrayObject[cocotb.types.Logic, cocotb.handle.LogicObject]represent arrays of single bits
Key insight: Cocotb already maps HDL array structures to appropriate Python generics, and Copra represents these in stub files. When you type dut.in_2d_arr_unpacked[0]. in your IDE, Pylance knows you’re accessing a LogicArrayObject (as cocotb determined) and can provide appropriate completions.
Example 3: Matrix Multiplier
The matrix_multiplier example combines parameters and multi-dimensional data:
- Control signals:
clk_i,reset_i,valid_i,valid_o(allLogicObject) - Matrix ports:
a_i,b_i,c_calc,c_o(allArrayObject[cocotb.types.LogicArray, cocotb.handle.LogicArrayObject]) - Parameters:
A_COLUMNS_B_ROWS,A_ROWS,B_COLUMNS,DATA_WIDTH(allLogicArrayObject)
This showcases how cocotb exposes design parameters (which Copra then captures in stubs), making them accessible in tests while maintaining type safety.
Integrating Copra into Your Cocotb Workflow
One of the goals of Copra is to be easy to integrate with minimal disruption to your existing cocotb workflow. Depending on whether you want stubs generated automatically on each test run or manually on demand, you can choose between the autostub and standalone modes.
Autostub (Automatic Stub Generation during Test Runs)
The simplest way to use Copra (and likely the way you’ll use it during development) is via autostub. Autostub means that every time you run your cocotb tests, the stub for the DUT will be generated as part of the test execution. Here’s how to set it up:
-
Install Copra: Add Copra to your project’s Python environment. For example, if using pip, you might do
pip install copra(or if it’s not on PyPI yet, install from the cocotb GitHub). This makes the copra package available to your testbench. -
Modify your Makefile: In your cocotb Makefile (which invokes the simulator), add Copra’s autostub module to the
COCOTB_TEST_MODULESvariable. For example:COCOTB_TEST_MODULES = copra.integration.autostub,your_test_moduleThis line ensures that when cocotb runs, it loads Copra’s autostub alongside your normal test module(s). The order here can matter; by listing
copra.integration.autostubfirst, you ensure the autostub test runs early. -
Run your tests as usual: No further changes needed. When you invoke
make(e.g.,make SIM=icarus TOPLEVEL=your_top ...), cocotb will start the simulation, and the Copra autostub will kick in. It will print something like[copra] Discovering HDL hierarchy…and later[copra] Stub written --> copra_stubs.pyito the console, indicating that it generated the stub file. By default, the stub is written to the current directory (you can override the output directory by setting theCOPRA_STUB_DIRenvironment variable if desired). -
Use the stub in your code/IDE: After the test run, you’ll find a
copra_stubs.pyifile. You can now import fromcopra_stubsin your test code underif TYPE_CHECKING(as shown earlier) to get the types. Also, configure your IDE to be aware of the stub file. In VS Code with Pylance, simply having the stub in the workspace and using the import as above is usually enough.
A typical development cycle with autostub would be: make a change to the DUT or its interface, run make to run tests – Copra autostub regenerates copra_stubs.pyi – open your test in the IDE and you immediately see the updated signals in the autocomplete.
How does autostub work internally? The autostub integration is a small cocotb test provided by Copra. It’s decorated with @cocotb.test() and therefore runs when loaded. It takes the dut handle (injected by cocotb) and calls Copra’s discovery and generation functions. It runs to completion (which typically is at simulation time 0 or very shortly after, as it doesn’t need to advance time for introspection). The autostub test doesn’t consume simulation time beyond what’s needed to instantiate the DUT, so it’s quite unobtrusive.
Standalone Stub Generation (Gen_Stubs Make Target or Script)
There are scenarios where you might want to generate the stub without running the full test suite. For example, maybe you want to quickly regenerate stubs after an HDL change without executing the tests, or you want to integrate stub generation into a CI pipeline separately from test execution. This is where the standalone stubgen comes in.
Copra’s standalone stub generation is essentially a small Python driver that invokes the simulator in batch mode to elaborate the design and run only the autostub portion, then exit. Generally, you can invoke it as:
# In your test directory, with environment variables set for your design:
COPRA_STUB_DIR=./some_output_dir \
COCOTB_TOPLEVEL=<top_module_name> \
TOPLEVEL_LANG=<verilog or vhdl> \
VERILOG_SOURCES="<list of your HDL files>" \
VHDL_SOURCES="<list of your HDL files>" \
$(shell cocotb-config --python-bin) path/to/copra/integration/standalone_stubgen.py
Yes, that’s a mouthful – which is why usually you’d wrap it in a Makefile target. The standalone script then programmatically invokes the cocotb test runner with the autostub as the only test. It will compile the HDL and then run the autostub test to generate the stub. After that, it exits – no user tests are run.
The standalone approach is great for CI: you can have a job that runs make gen_stubs to update the stub and perhaps even diff it against a checked-in stub to ensure it’s up-to-date. It’s also useful if you want to inspect the stub for a design without running any test.
Using the Generated Stubs in Your IDE and Tests
Regardless of which integration method you use, once copra_stubs.pyi is generated, how do you use it? Let’s cover the two main use-cases: IDE autocompletion and static type checking.
IDE Autocomplete (Pylance, PyCharm, etc.): In VS Code with Pylance, the presence of a .pyi stub is usually automatically picked up if you import it. In our tests, we do an if TYPE_CHECKING: from copra_stubs import <TopClass> as DUT. Pylance (and MyPy) evaluate that import in a type-checking context. The copra_stubs.pyi file defines a class <TopClass> (like Adder, MatrixMultiplier, etc.), so it knows what DUT is. Then, in a test function definition def test_something(dut: DUT), Pylance infers that dut is an instance of that stub class. Therefore, as soon as you type dut. in the editor, Pylance will show the list of attributes defined in the stub class. This transforms the cocotb development experience – no more guessing signal names or manually checking HDL.
Static Type Checking (mypy or others): If you run mypy on your test Python code, it will utilize the stub as well. For instance, if in your test you wrote dut.foobar.value = 1 but foobar does not exist in the DUT (and thus not in the stub), mypy will error out: “Adder (or DUT) has no attribute foobar”. This is great for catching typos.
Continuous Workflow: You might wonder, do I have to re-run the simulation every time I want updated stubs? If you change the HDL (add/remove signals), yes, you should regenerate the stub (via either autostub by running a quick sim, or standalone). If you only change Python test code, the stub remains valid.
Now, let’s illustrate the process of running a test with autostub via a sequence diagram. This will show the interactions between your test, Copra, and the simulator during a typical run:
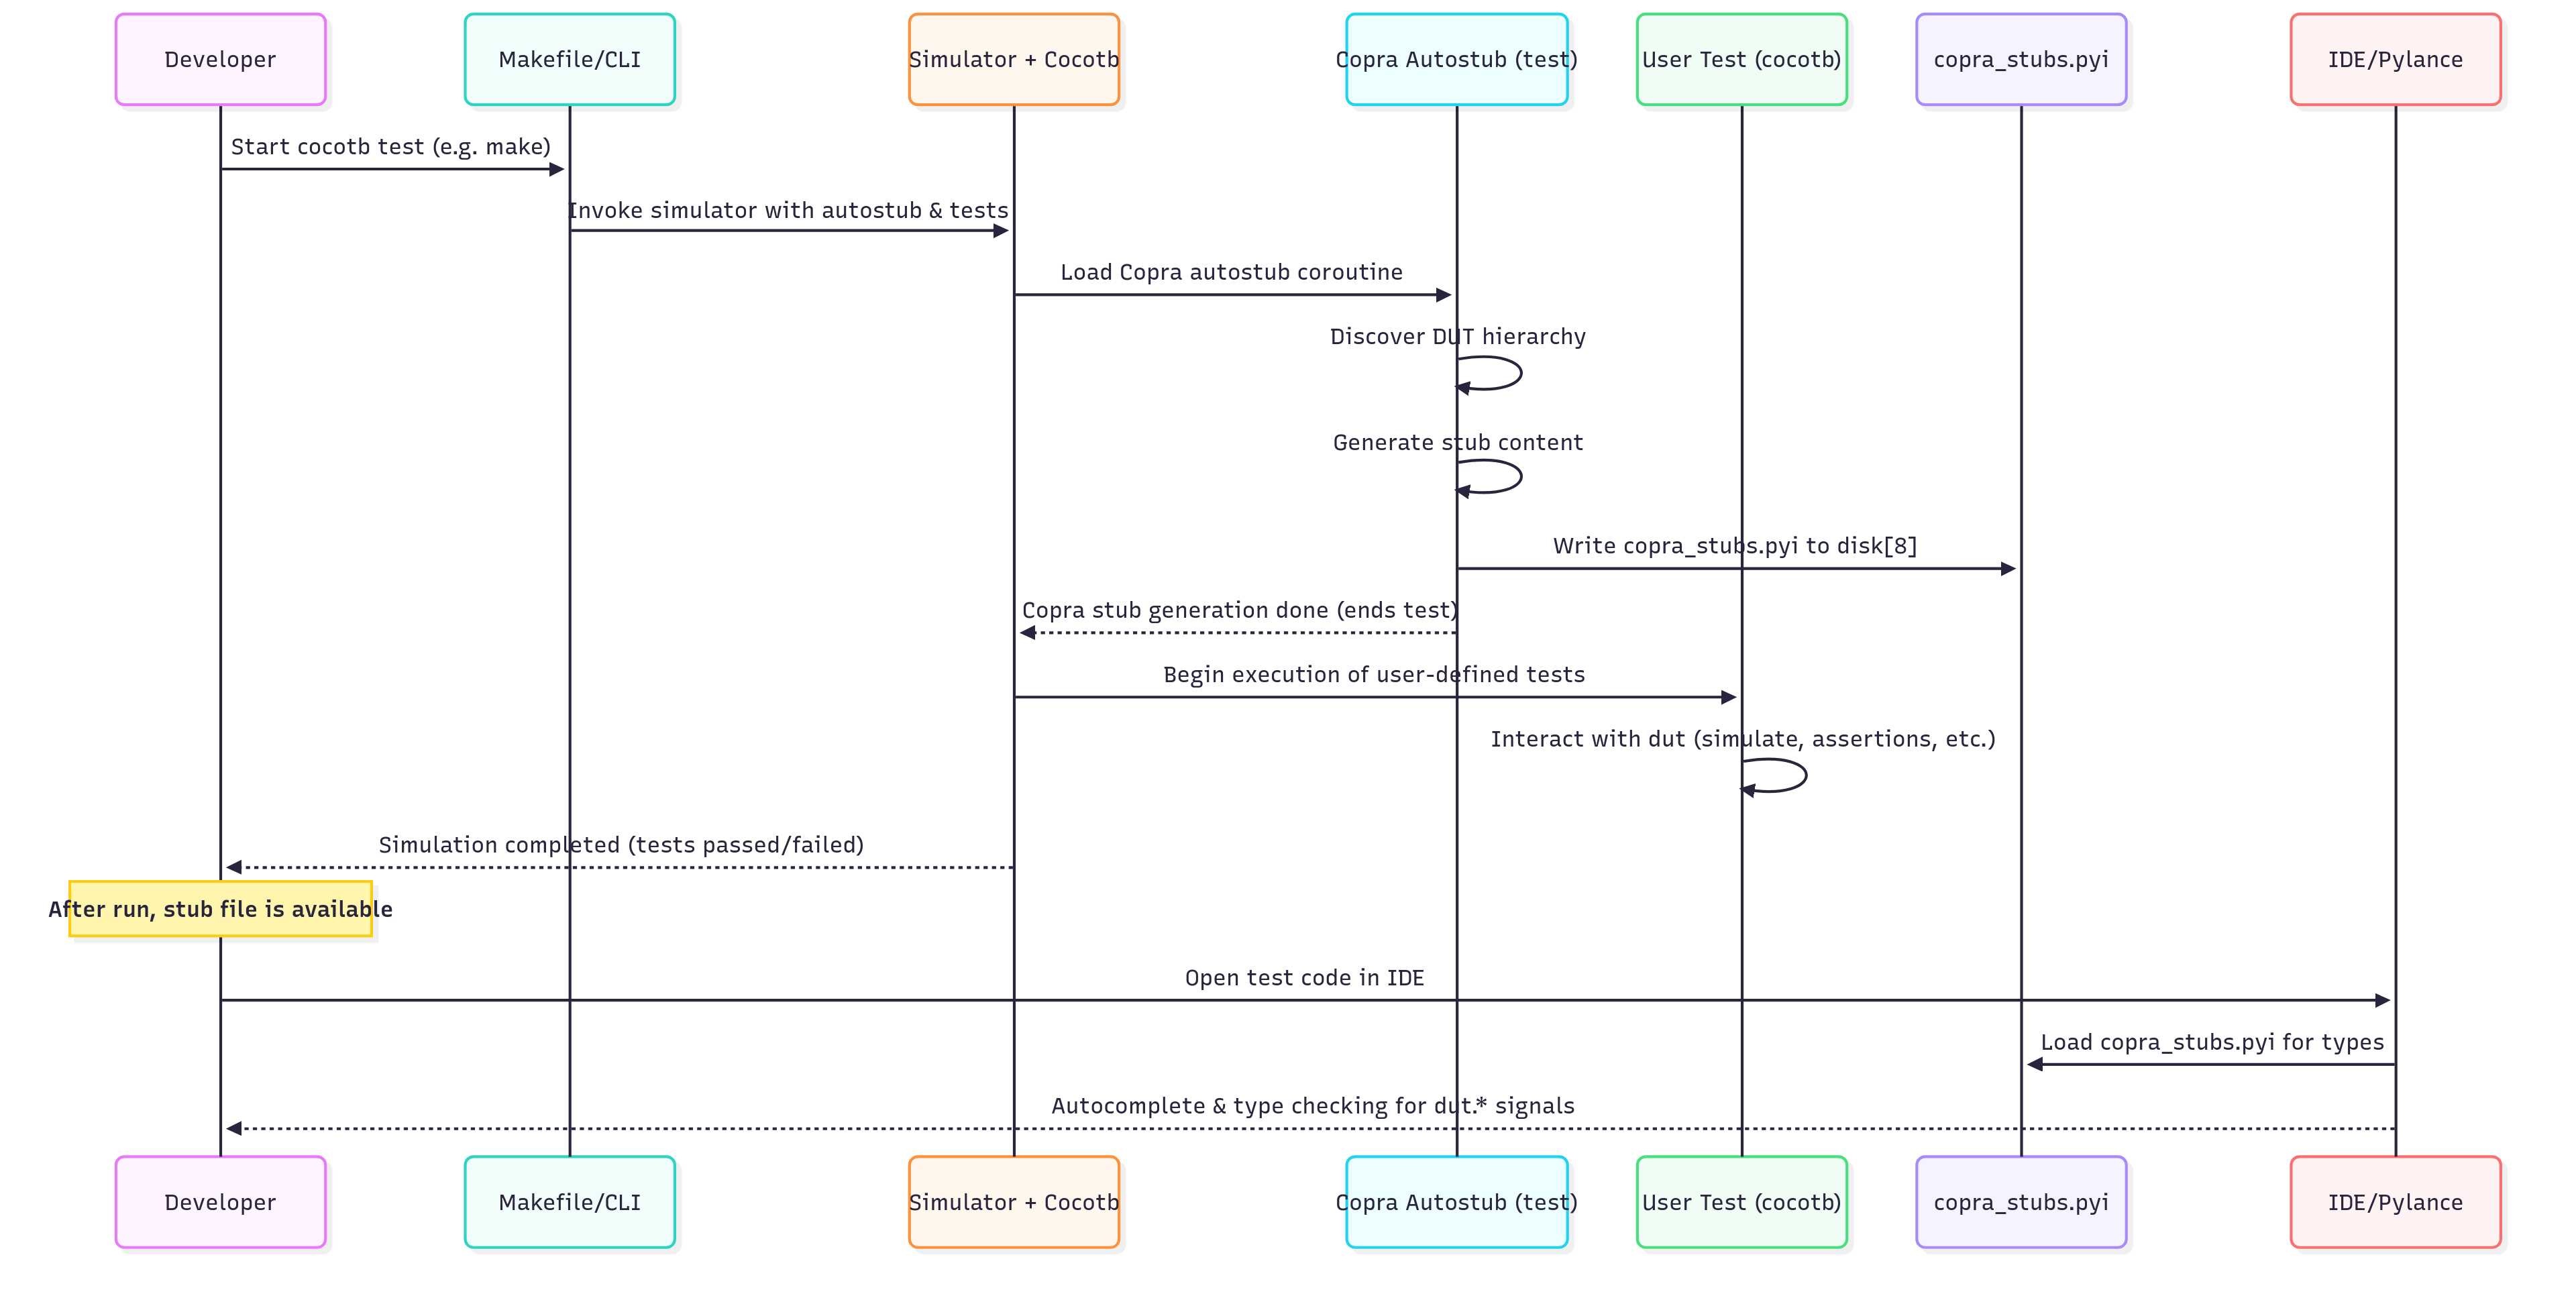
In this sequence, you can see that the Copra autostub test runs at the very start of the simulation (even before the user test executes) and produces the stub file. The user test then runs normally. After the simulation, the developer’s IDE has the updated stub to work with.
Tips, Tricks, and Things to Know
Before we conclude, here are a few additional tips and notes about using Copra:
Name Sanitization: Copra will try to make Python-safe class and attribute names. If your HDL uses names that aren’t valid Python identifiers (spaces, leading digits, reserved words, etc.), Copra may alter them (e.g., add an underscore, or in case of collisions append something). It will still keep them recognizable. For accessing those tricky signals, use dut["actual hdl name"] syntax. The stub’s __getitem__ overloads make even the weird names visible to your IDE. For instance, a signal named “reset/n” (with a slash) can’t be an attribute, but you can do dut["reset/n"] and the stub will know that returns a LogicObject.
Private/Generated Signals: If your DUT has hidden signals or ones starting with underscore (common for VHDL generate temp signals), Copra by default will not expose signals that start with _ as attributes (treating them as “private”). They would still be accessible via getitem if needed. This helps declutter the stub for most users who only care about interface signals.
Changing Output Location: Use COPRA_STUB_DIR env var to specify where the stub file should go. For example, you might set COPRA_STUB_DIR=./stubs in your Makefile if you want all stub files collected in one folder for large projects.
Multiple Top Levels: In most cocotb use cases, you run one top-level design at a time. But what if you had multiple DUTs? You would likely run them separately (with different COCOTB_TOPLEVEL settings) to generate separate stub files. Since the stub file name is fixed by default, you’d either run them in different directories (so they don’t overwrite each other) or customize the name per run.
Performance: The stub generation is very fast in our experience. It’s mostly Python iterating over the hierarchy, which for even large designs (thousands of signals) should be sub-second. The examples and tests in Copra ensure the stub generation doesn’t alter simulation behavior and remains stable.
Versioning Consideration: Because Copra is currently in alpha, you’ll want to pin a specific version in your requirements. The plan is that it will track cocotb’s major releases (likely requiring cocotb 2.0 or above once that is out). The stub format (.pyi) is standard, and you can open it to inspect it anytime – consider it an artifact of your build.
Conclusion
Copra bridges the gap between cocotb’s dynamic flexibility and modern Python tooling’s static analysis capabilities. By automatically generating type stubs from your HDL designs, it transforms the testbench development experience:
- No more signal name guessing - IDE autocomplete shows all available signals
- Catch typos early - Static type checking prevents runtime AttributeErrors
- Better documentation - Stubs serve as a Python view of your HDL interface
- Improved productivity - Focus on test logic rather than remembering signal names
As an official cocotb subproject currently in alpha, Copra represents the future of Python-based hardware verification tooling. Try it in your next cocotb project and experience the difference that proper IDE support makes.
The name “Copra” - the dried coconut kernel - perfectly captures its role as the essential core supporting your cocotb testbench. Just as copra provides the nutritious foundation for coconut products, Copra provides the type information foundation for productive testbench development.
A bit of wit: Since we promised occasional lightness – using Copra in your cocotb workflow might feel like having an overly helpful colleague looking over your shoulder: “Oh, you want to toggle dut.config_reg[3]? Don’t worry, I autocompleted that for you.” It’s the same cocotb you love, just with less guesswork. Considering cocotb’s name comes from “coconut” and “testbench”, having Copra (the coconut meat) means you now have the whole coconut in your toolbox.
Ready to give your cocotb workflow the IDE support it deserves? Check out Copra on GitHub and start enjoying the benefits of modern Python tooling in your hardware verification projects.